To Upload an Android App Bundle You Must Be Enrolled in App Signing by Google Play.
Android requires that all APKs be digitally signed with a certificate before they are installed on a device or updated. When releasing using Android App Bundles, you need to sign your app bundle with an upload primal before uploading it to the Play Console, and Play App Signing takes care of the rest. For apps distributing using APKs on the Play Store (created before Baronial 2021) or on other stores, y'all must manually sign your APKs for upload.
This folio guides you lot through some important concepts related to app signing and security, how to sign your app for release to Google Play using Android Studio, and how to configure Play App Signing.
The following is a high-level overview of the steps you might need to take to sign and publish a new app to Google Play:
- Generate an upload primal and keystore
- Sign your app with your upload key
- Configure Play App Signing
- Upload your app to Google Play
- Prepare & scroll out release of your app
If instead your app is already published to the Google Play Store with an existing app signing key, or yous would like to choose the app signing key for a new app instead of having Google generate information technology, follow these steps:
- Sign your app with your app's signing key and select the pick to encrypt and export its signing fundamental.
- Upload your app'south signing fundamental to Play App Signing.
- (Recommended) Generate and register an upload certificate for futurity updates to your app
- Upload your app to Google Play
- Set & roll out release of your app
This page also explores how to manage your own keys for when uploading your app to other app stores. If yous do not use Android Studio or would rather sign your app from the command line, acquire near how to use apksigner.
Play App Signing
With Play App Signing, Google manages and protects your app's signing fundamental for you and uses information technology to sign your APKs for distribution. And, because app bundles defer building and signing APKs to the Google Play Store, you lot demand to configure Play App Signing before you upload your app bundle. Doing and so lets you benefit from the following:
- Employ the Android App Bundle and support Google Play's avant-garde commitment modes. The Android App Bundle makes your app much smaller, your releases simpler, and makes it possible to use feature modules and offer instant experiences.
- Increase the security of your signing key, and make it possible to employ a separate upload fundamental to sign the app packet you upload to Google Play.
-
One time key upgrade for new installs lets you lot change your app signing key in example your existing ane is compromised or if you lot need to migrate to a cryptographically stronger key
Play App Signing uses two keys: the app signing fundamental and the upload cardinal, which are described in farther detail in the section about Keys and keystores. You keep the upload key and use it to sign your app for upload to the Google Play Shop. Google uses the upload certificate to verify your identity, and signs your APK(s) with your app signing key for distribution as shown in effigy 1. Past using a separate upload key you can request an upload fundamental reset if your key is ever lost or compromised.
By comparison, for apps created before Baronial 2021 that have not opted in to Play App Signing, if you lose your app's signing key, you lose the ability to update your app.
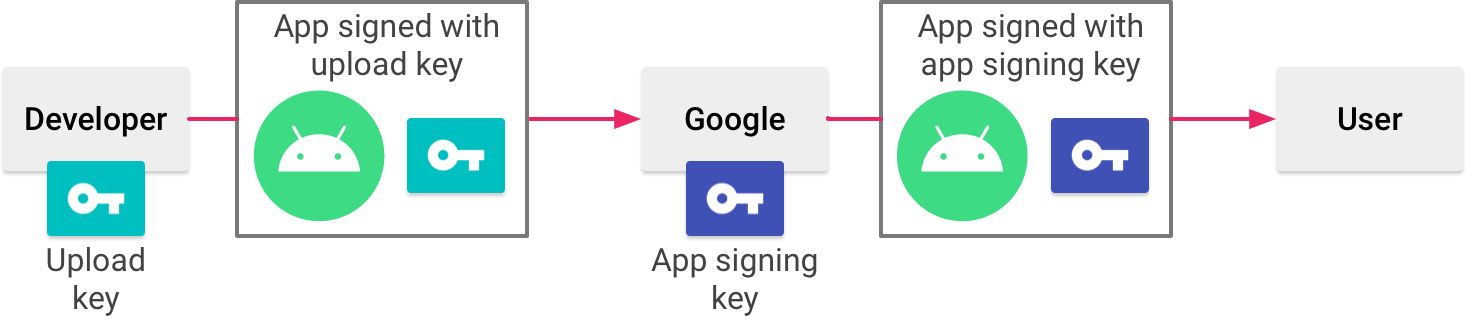
Figure i. Signing an app with Play App Signing
Your keys are stored on the same infrastructure that Google uses to shop its own keys, where they are protected by Google'due south Fundamental Management Service. Y'all can acquire more nigh Google's technical infrastructure by reading the Google Deject Security Whitepapers.
When you apply Play App Signing, if you lose your upload key, or if it is compromised, you can contact Google to revoke your quondam upload cardinal and generate a new one. Because your app signing key is secured past Google, you can continue to upload new versions of your app every bit updates to the original app, fifty-fifty if y'all change upload keys. To acquire more, read Reset a lost or compromised private upload key.
The next section describes some important terms and concepts related to app signing and security. If y'all'd rather skip ahead and acquire how to set your app for upload to the Google Play Shop, go to Sign your app for release.
Keystores, keys, and certificates
Java Keystores (.jks or .keystore) are binary files that serve as repositories of certificates and individual keys.
A public central document (.der or .pem files), also known every bit a digital document or an identity certificate, contains the public key of a public/private fundamental pair, likewise as another metadata identifying the owner (for case, proper noun and location) who holds the respective private key.
The post-obit are the different types of keys you should sympathise:
- App signing cardinal: The cardinal that is used to sign APKs that are installed on a user's device. Equally part of Android's secure update model, the signing key never changes during the lifetime of your app. The app signing key is private and must be kept hugger-mugger. You can, however, share the certificate that is generated using your app signing key.
-
Upload key: The key y'all employ to sign the app bundle or APK earlier you upload it for app signing with Google Play. You must keep the upload fundamental secret. Nevertheless, yous can share the certificate that is generated using your upload key. You may generate an upload key in one of the post-obit means:
- If you choose for Google to generate the app signing key for you when yous opt in, then the key you use to sign your app for release is designated as your upload key.
- If y'all provide the app signing key to Google when opting in your new or existing app, then you take the option to generate a new upload primal during or after opting in for increased security.
- If you do non generate a new upload fundamental, yous proceed to use your app signing key equally your upload cardinal to sign each release.
Tip: To proceed your keys secure, it's a practiced idea to make sure your app signing key and upload fundamental are different.
Working with API providers
Yous can download the certificate for the app signing key and your upload cardinal from the Release > Setup > App Integrity page in the Play Console. This is used to annals public key(s) with API providers; it's intended to be shared, as information technology does non contain your private cardinal.
A document fingerprint is a short and unique representation of a document that is often requested by API providers aslope the package proper noun to register an app to use their service. The MD5, SHA-1 and SHA-256 fingerprints of the upload and app signing certificates can be constitute on the app signing page of the Play Console. Other fingerprints tin can as well be computed by downloading the original certificate (.der) from the same folio.
Sign your debug build
When running or debugging your projection from the IDE, Android Studio automatically signs your app with a debug document generated by the Android SDK tools. The outset time you run or debug your project in Android Studio, the IDE automatically creates the debug keystore and certificate in $Habitation/.android/debug.keystore, and sets the keystore and key passwords.
Considering the debug document is created by the build tools and is insecure by design, most app stores (including the Google Play Shop) do not accept apps signed with a debug certificate for publishing.
Android Studio automatically stores your debug signing data in a signing configuration and so you do not have to enter it every time you lot debug. A signing configuration is an object consisting of all of the necessary information to sign your app, including the keystore location, keystore countersign, key proper noun, and fundamental password.
For more information about how to build and run apps for debugging, encounter Build and Run Your App.
Expiry of the debug certificate
The self-signed certificate used to sign your app for debugging has an expiration date of 30 years from its creation date. When the certificate expires, you get a build error.
To fix this trouble, simply delete the debug.keystore file stored in one of the following locations:
-
~/.android/on OS 10 and Linux -
C:\Documents and Settings\user\.android\on Windows XP -
C:\Users\user\.android\on Windows Vista and Windows 7, 8, and 10
The side by side time you build and run a debug version of your app, Android Studio regenerates a new keystore and debug fundamental.
Sign your app for release to Google Play
When you lot are ready to publish your app, you need to sign your app and upload it to an app store, such as Google Play. When publishing your app to Google Play for the first time, you must also configure Play App Signing. Play App Signing is optional for apps created before August 2021. This section shows you lot how to properly sign your app for release and configure Play App Signing.
Generate an upload key and keystore
If you don't already have an upload cardinal, which is useful when configuring Play App Signing, you can generate 1 using Android Studio as follows:
- In the bill of fare bar, click Build > Generate Signed Parcel/APK.
- In the Generate Signed Package or APK dialog, select Android App Packet or APK and click Next.
- Below the field for Key shop path, click Create new.
-
On the New Key Store window, provide the following information for your keystore and fundamental, as shown in figure 2.
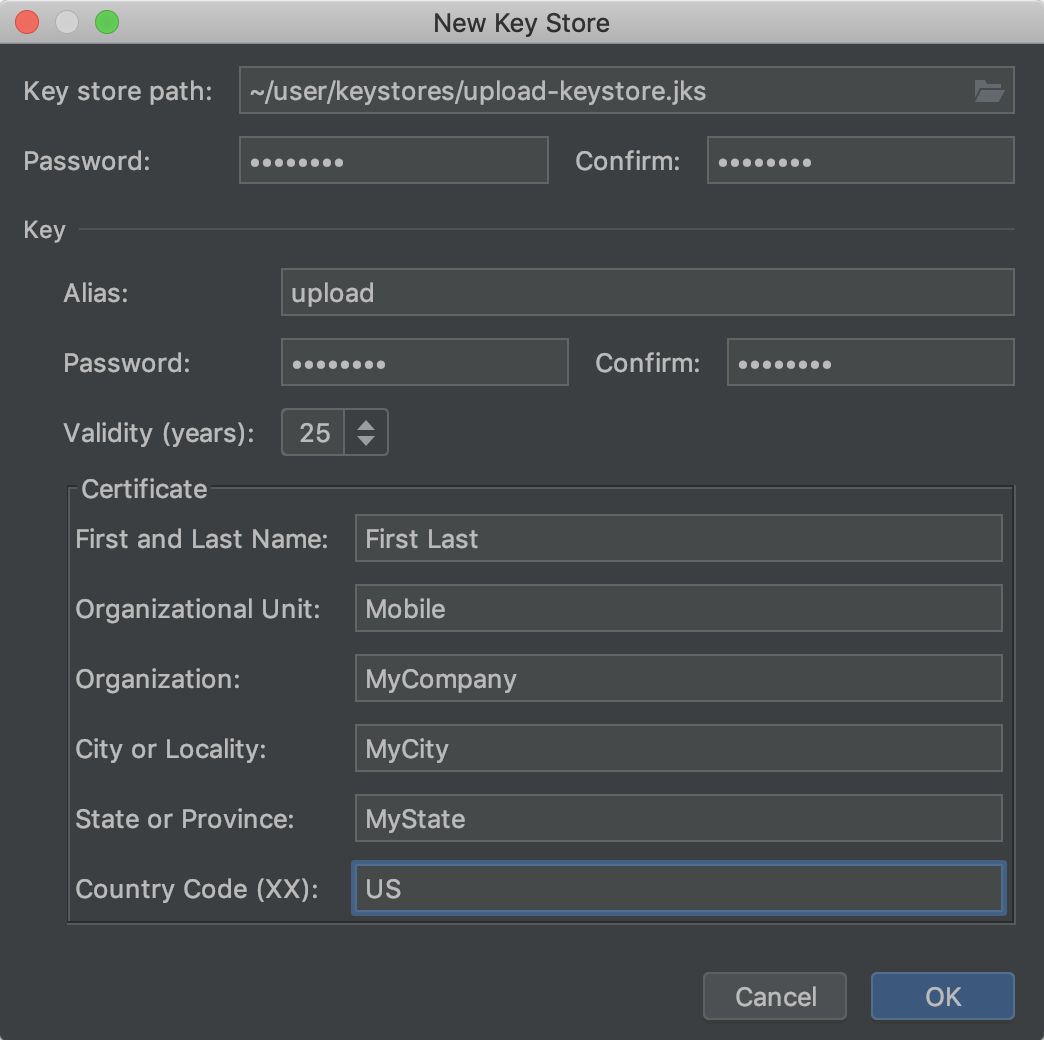
Figure 2. Create a new upload key and keystore in Android Studio.
-
Keystore
- Key store path: Select the location where your keystore should exist created. Also, a file name should be added to the end of the location path with the
.jksextension. - Password: Create and confirm a secure password for your keystore.
- Key store path: Select the location where your keystore should exist created. Also, a file name should be added to the end of the location path with the
-
Cardinal
- Alias: Enter an identifying proper name for your key.
- Password: Create and ostend a secure password for your central. This should be the aforementioned equally your keystore countersign. (Please refer to the known event for more information)
- Validity (years): Prepare the length of time in years that your central will exist valid. Your key should exist valid for at least 25 years, and then you can sign app updates with the aforementioned key through the lifespan of your app.
- Certificate: Enter some information about yourself for your certificate. This information is not displayed in your app, but is included in your certificate as part of the APK.
-
Once yous complete the class, click OK.
-
If yous would like to build and sign your app with your upload key, continue to the department most how to Sign your app with your upload key. If you only want to generate the key and keystore, click Cancel.
Sign your app with your key
If you already accept an upload key, use it to sign your app. If instead your app is already signed and published to the Google Play store with an existing app signing key, use information technology to sign your app and make sure to encrypt and export it to opt your app in to Play App Signing. You tin later generate a separate upload fundamental and register your upload key's public certificate with Google Play to sign and upload subsequent updates to your app.
To sign your app using Android Studio, and export an existing app signing key, follow these steps:
- If you don't currently have the Generate Signed Package or APK dialog open, click Build > Generate Signed Package/APK.
- In the Generate Signed Packet or APK dialog, select either Android App Bundle or APK and click Next.
- Select a module from the drop downwards.
-
Specify the path to your keystore, the alias for your key, and enter the passwords for both. If you oasis't all the same prepared your upload keystore and key, get-go Generate an upload fundamental and keystore and then return to complete this footstep.
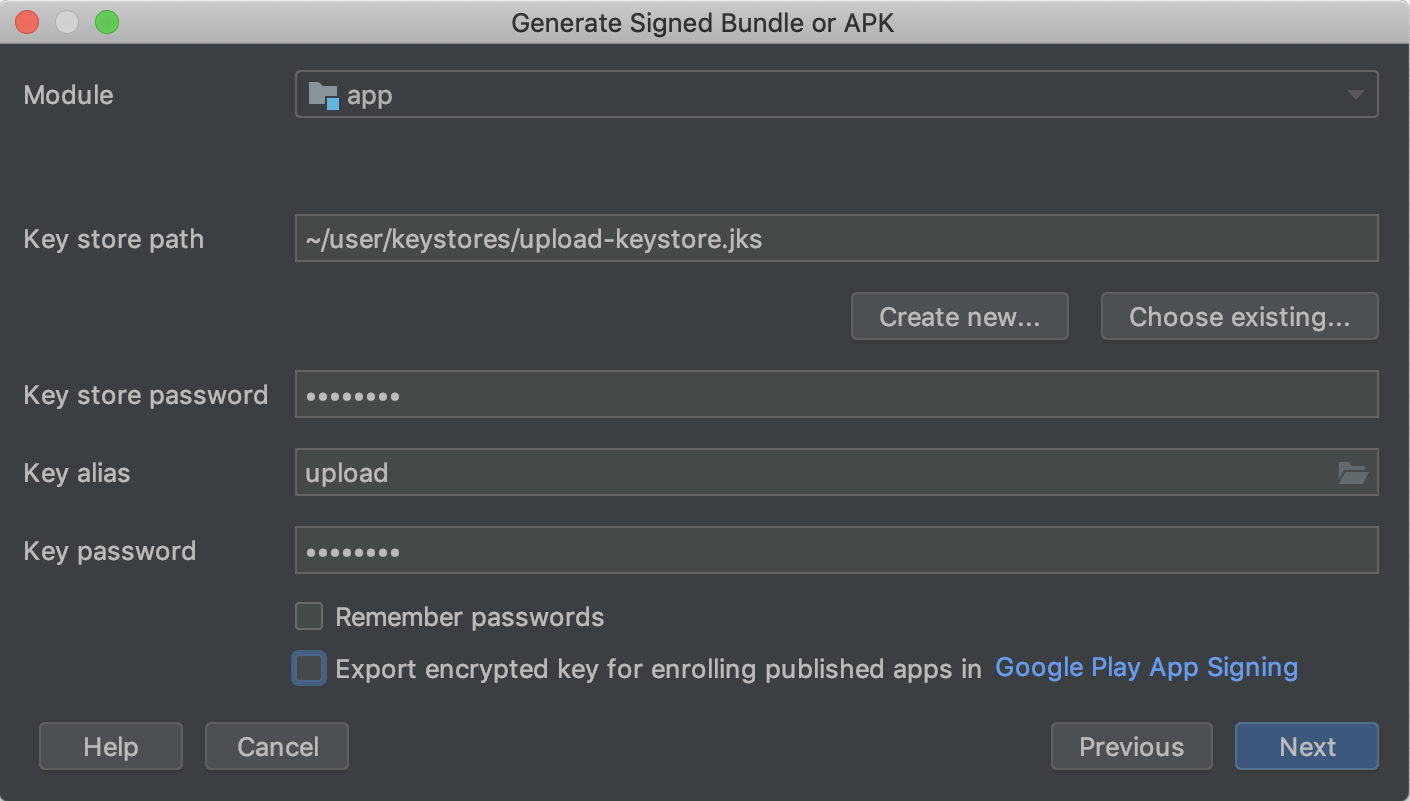
Effigy iii. Sign your app with your upload key.
-
If you're signing an app packet with an existing app signing central, and you lot'd like to later opt your app in to Play App Signing, bank check the box side by side to Export encrypted key and specify a path to save your signing key as an encrypted
*.pepkfile. You lot tin can then apply your encrypted app signing key to opt in an existing app into Play App Signing. -
Click Next.
-
In the next window (shown in figure 4), select a destination binder for your signed app, select the build type, choose the product flavor(s) if applicative.
-
If you are building and signing an APK, you need to select which Signature Versions you desire your app to back up. To learn more than, read about app signing schemes
-
Click Finish.
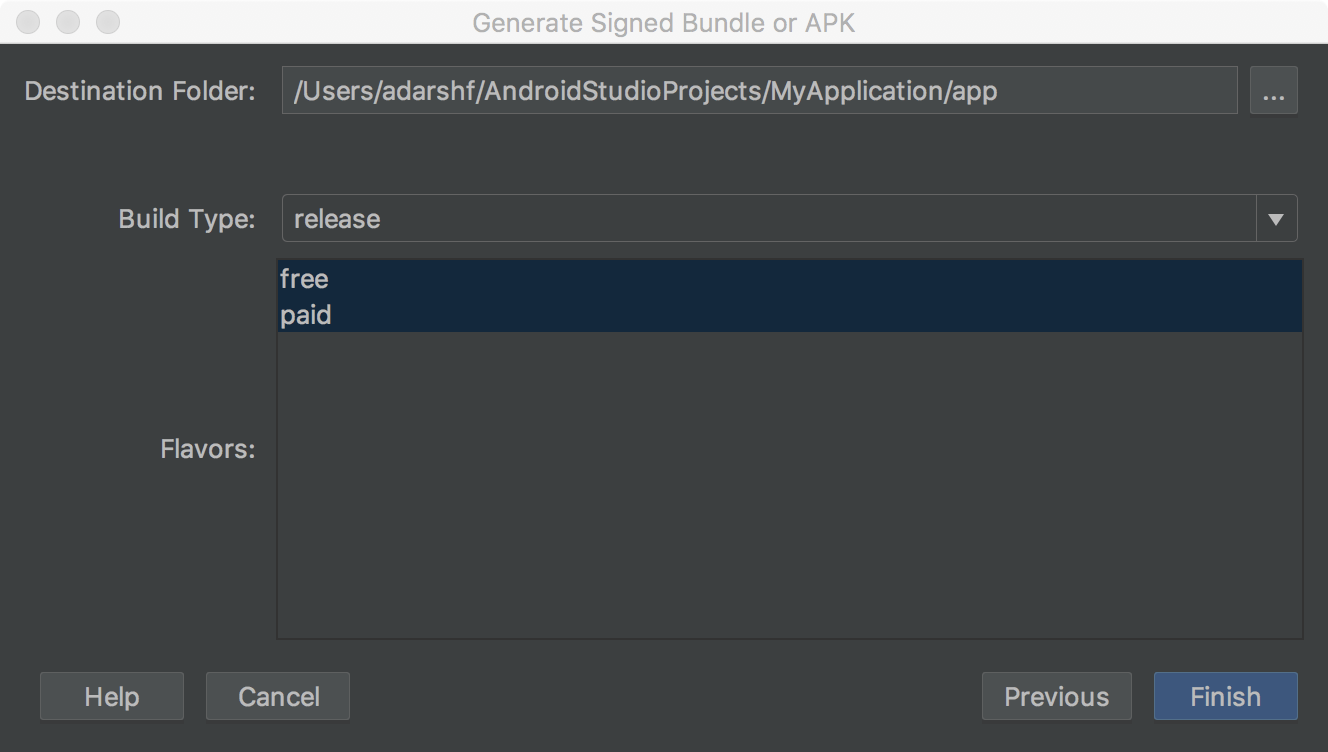
Figure 4. Generate a signed version of your app for the selected production flavors.
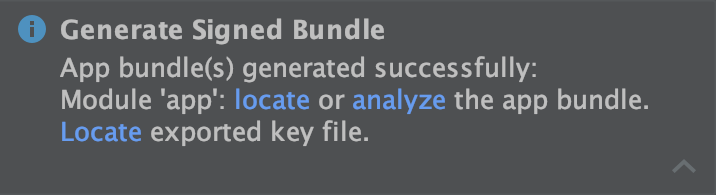
Figure 5. Click the link in the popup to analyze or locate your app parcel, or locate your exported signing primal.
Later Android Studio finishes building your signed app, you tin can either locate or analyze your app by clicking on the advisable choice in the popular-up notification. If yous selected the option to export your signing primal, yous can chop-chop navigate to it by clicking the dropdown pointer in the bottom right corner of the popup to expand it and clicking Show Exported Primal File, equally shown in effigy 5.
Now yous're ready to opt your app in to Play App Signing and upload your app for release. If you're new to the app publishing process, y'all may want to read the Launch overview. Otherwise, continue to the page about how to Upload your app to the Play Console.
Using Play App Signing
As described before in this page, configuring Play App Signing is required to sign your app for distribution through Google Play (except for apps created before Baronial 2021, which may continue distributing cocky-signed APKs). The steps you need to take depend on whether your app has not even so been published to Google Play, or your app is already signed and was published before August 2021 using an existing app signing key.
Configure a new app
To configure signing for an app that has not all the same been published to Google Play, go on as follows:
- If you haven't already done so, generate an upload key and sign your app with that upload key.
- Sign in to your Play Console.
- Follow the steps to prepare & roll out your release to create a new release.
- Later you choose a release track, configure app signing under the App Integrity section as follows:
- To have Google Play generate an app signing key for you and use it to sign your app, you don't have to do anything. The key you use to sign your outset release becomes your upload key, and you should apply it to sign future releases.
- To use the same key as another app on your developer account, select Change app signing key > Apply my own key > Utilize the same cardinal as some other app in this account, select an app, and and so click Proceed.
- To provide your own signing key for Google to use when signing your app, select Modify app signing primal > Use my own fundamental and select 1 of the options that lets you securely upload a private key and its public certificate.
In the department called App Bundles, click Browse files to locate and upload the app you signed using your upload cardinal. For more data about releasing your app, refer to prepare & roll out your release. When y'all release your app later on configuring Play App Signing, Google Play generates (unless you upload an existing key) and manages your app's signing key for you. Simply sign subsequent updates to your app using your app's upload key before uploading it to Google Play.
If you need to create a new upload key for you app, go to the section about how to Reset a lost or compromised individual upload key.
Opt in an existing app
If y'all're updating an app that'due south already published to Google Play using an existing app signing central, you tin opt in to Play App Signing as follows:
- If yous haven't already washed so, sign your app using Android Studio with your existing app signing key and brand sure to check the box next to Export encrypted fundamental to save your signing key as an encrypted
*.pepkfile. Y'all'll need this file in a later stride. This tin besides be done using the PEPK tool, which yous can download from the Play Panel. - Sign in to your Play Console and navigate to your app.
- On the left menu, click Release > Setup > App integrity.
- If applicable, review the Terms of Service and select Accept.
- Select one of the options that best describes the signing key you want to upload to Google Play and follow the instructions that are shown. For example, if you lot used Android Studio to export your app's signing key, as described on this page, select Upload a central exported from Android Studio and upload the
*.pepkfile for your key. - Click Enroll.
You should now see a folio with the details of your app's signing and upload certificates. Google Play now signs your app with your existing key when deploying it to users. Nevertheless, one of the almost important benefits to Play App Signing is the power to separate the key yous use to sign the artifact you lot upload to Google Play from the key that Google Play uses to sign your app for distribution to users. So, consider following the steps in the side by side department to generate and annals a dissever upload cardinal.
Generate and register an upload certificate
When you lot're publishing an app that is non signed past an upload primal, the Google Play Console provides the option to register one for future updates to the app. Although this is an optional step, information technology'south recommended that y'all publish your app with a key that's divide from the i Google Play uses to distribute your app to users. That mode, Google keeps your signing key secure, and you take the option to reset a lost or compromised individual upload primal. This section describes how to create an upload key, generate an upload certificate from information technology, and annals that certificate with Google Play for time to come updates of your app.
The post-obit describes the situations in which yous run into the option to register an upload document in the Play Console:
- When you publish a new app that's signed with a signing primal and opt it in to Play App Signing.
- When you lot are about to publish an existing app that'due south already opted in to Play App Signing, but it is signed using its signing key.
If you are non publishing an update to an existing app that's already opted in to Play App Signing, and you lot'd like to annals an upload certificate, complete the steps below and go along on to the section nigh how to reset a lost or compromised individual upload key.
If you oasis't already done so, generate an upload key and keystore.
After you create your upload key and keystore, you need to generate a public certificate from your upload cardinal using keytool, with the post-obit command:
$ keytool -export -rfc -keystore your-upload-keystore.jks -alias upload-alias -file output_upload_certificate.pem
Now that you have your upload certificate, annals it with Google when prompted in the Play Console or read the department beneath to annals it though the Google Play back up team.
Upgrade your app signing fundamental
In some circumstances, yous might want to alter your app'due south signing primal. For example, because you desire a cryptographically stronger primal or your signing key has been compromised. All the same, because users can simply update your app if the update is signed with the same signing fundamental, it's difficult to change the signing primal for an app that's already published.
If y'all publish your app to Google Play, you can upgrade the signing key for your published app through the Play Console—your new fundamental is used to sign new installs and app updates, while your older app signing central is used to sign updates for users who installed your app before the cardinal upgrade.
To learn more than, read Upgrade your app signing key for new installs.
Reset a lost or compromised private upload key
If you lost your private upload key or your individual key has been compromised, y'all can create a new one and contact the Google Play back up team to reset the key.
Configure the build procedure to automatically sign your app
In Android Studio, you can configure your projection to sign the release version of your app automatically during the build procedure by creating a signing configuration and assigning it to your release build blazon. A signing configuration consists of a keystore location, keystore password, key alias, and key password. To create a signing configuration and assign it to your release build type using Android Studio, complete the post-obit steps:
- In the Project window, right click on your app and click Open up Module Settings.
- On the Project Structure window, under Modules in the left panel, click the module you would like to sign.
- Click the Signing tab, and so click Add
 .
. -
Select your keystore file, enter a name for this signing configuration (as y'all may create more than than 1), and enter the required information.

Effigy 7. The window for creating a new signing configuration.
- Click the Build Types tab.
- Click the release build.
-
Under Signing Config, select the signing configuration you just created.
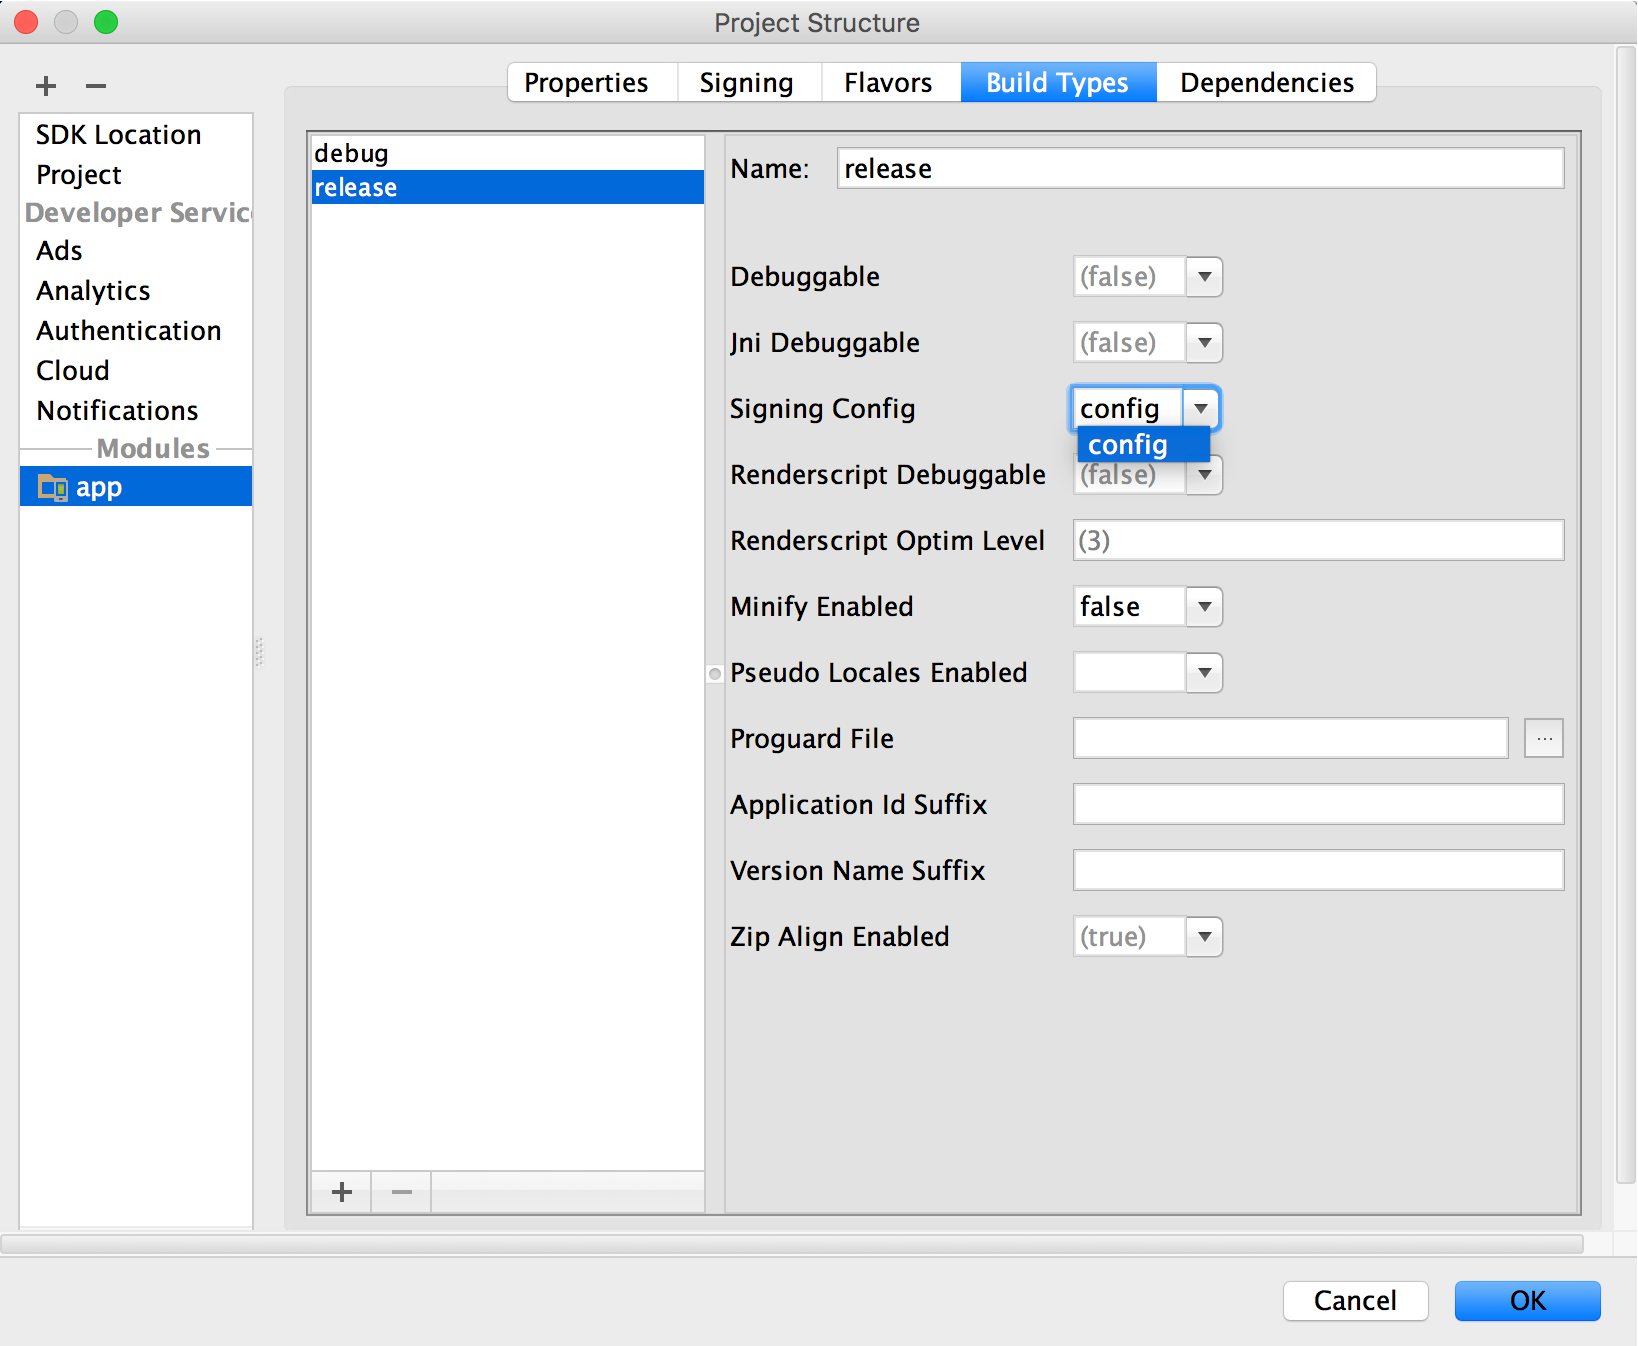
Figure 8. Select a signing configuration in Android Studio.
- Click OK.
Now every fourth dimension you build your release build type past selecting an selection under Build > Build Parcel(s) / APK(s) in Android Studio, the IDE volition sign your app automatically, using the signing configuration you specified. Yous can observe your signed APK or app bundle in the build/outputs/ directory inside the project directory for the module y'all are edifice.
When you create a signing configuration, your signing information is included in evidently text in your Gradle build files. If you are working in a squad or sharing your code publicly, yous should keep your signing information secure by removing it from the build files and storing it separately. You can read more than about how to remove your signing information from your build files in Remove Signing Information from Your Build Files. For more about keeping your signing information secure, read Secure your central.
Sign each product season differently
If your app uses product flavors and you would similar to sign each flavour differently, you can create additional signing configurations and assign them past flavor:
- In the Project window, right click on your app and click Open Module Settings.
- On the Projection Structure window, under Modules in the left panel, click the module you would similar to sign.
- Click the Signing tab, and so click Add together .
-
Select your keystore file, enter a name for this signing configuration (as you may create more than one), and enter the required data.
Figure 10. The window for creating a new signing configuration.
- Echo steps 3 and 4 equally necessary until you accept created all your signing configurations.
- Click the Flavors tab.
- Click the flavor you would like to configure, then select the appropriate signing configuration from the Signing Config dropdown carte du jour.
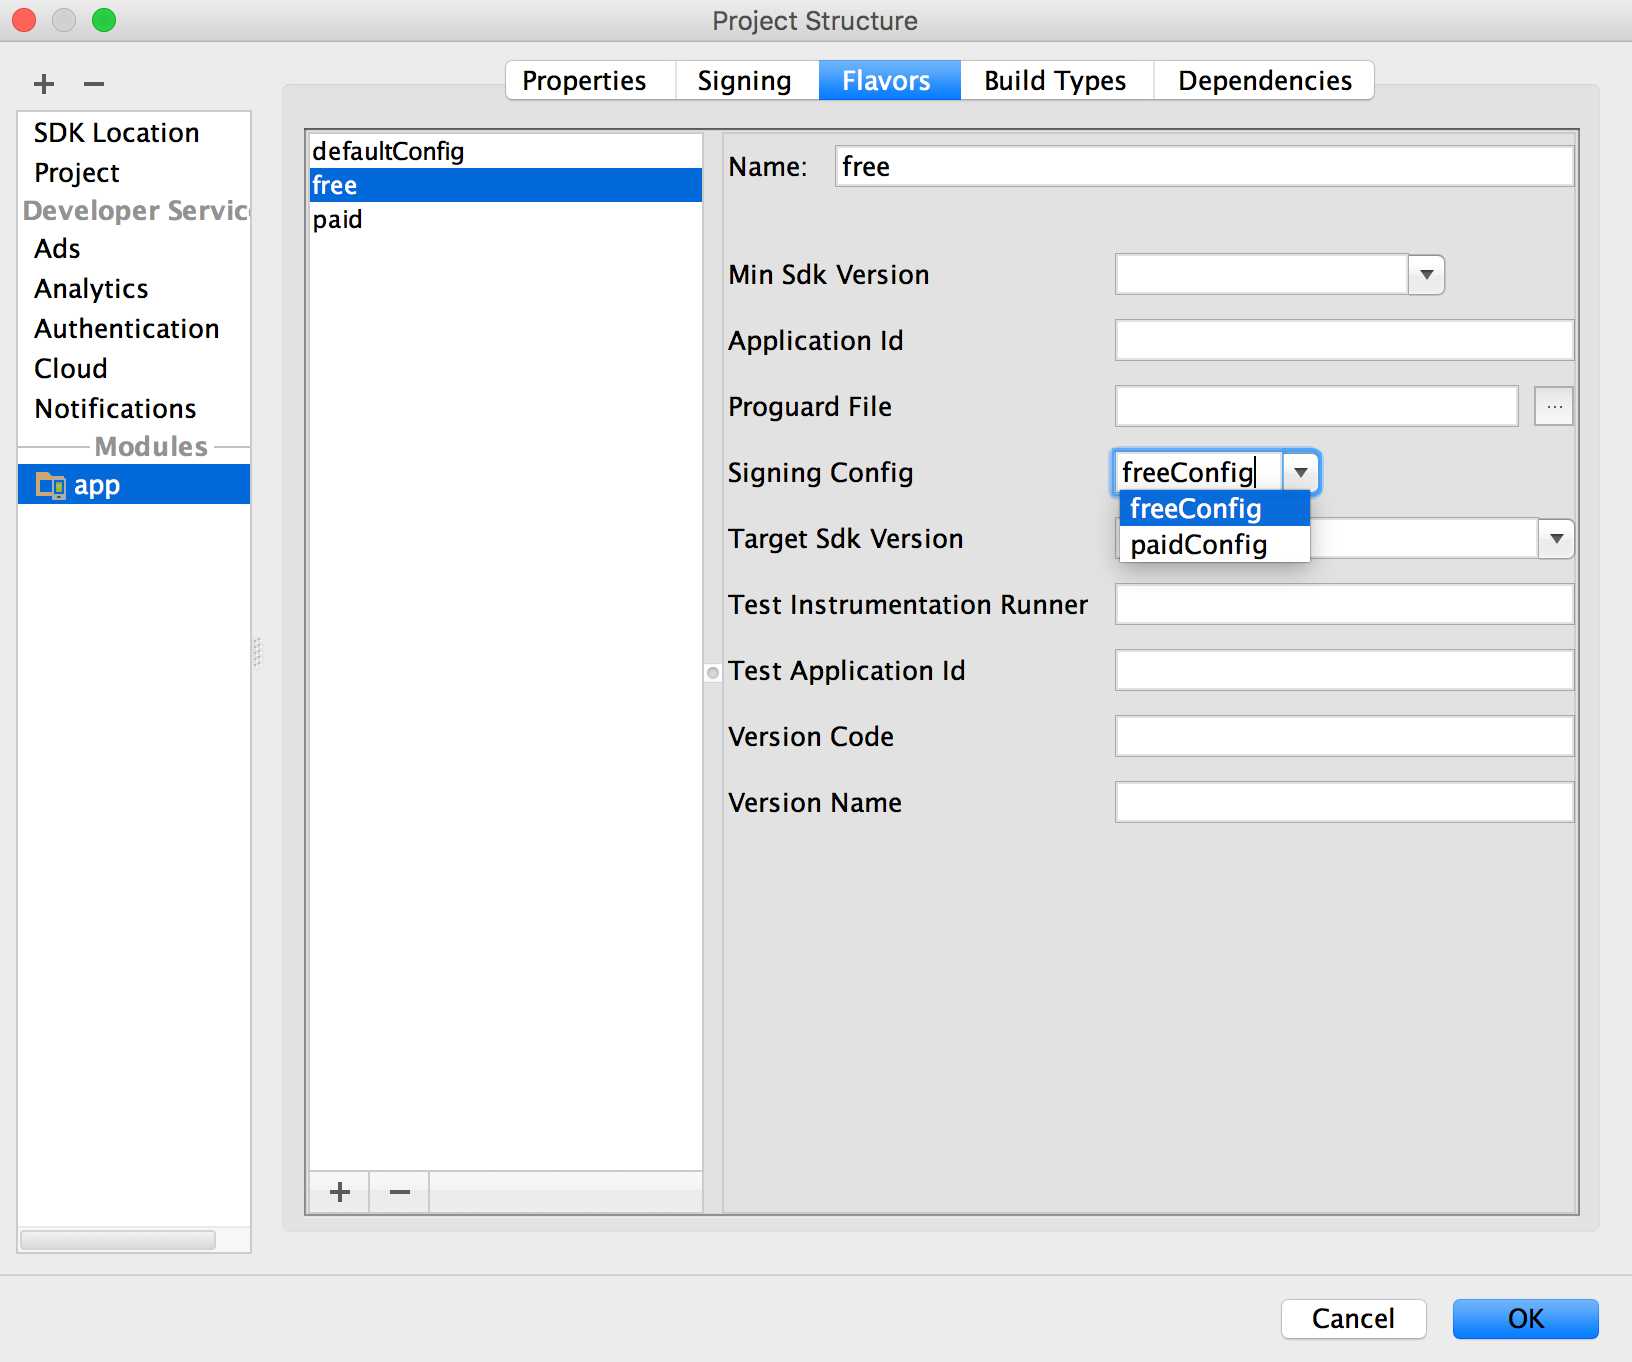
Figure 11. Configure signing settings by product flavor.
Repeat to configure any additional production flavors.
- Click OK.
You tin can also specify your signing settings in Gradle configuration files. For more data, see Configuring Signing Settings.
Manage your ain signing fundamental
If yous choose not to opt in to Play App Signing (merely for apps created before August 2021), you tin can manage your own app signing key and keystore. Keep in heed, you are responsible for securing the fundamental and the keystore. Additionally, your app volition non exist able to support Android App Bundles, Play Feature Commitment and Play Asset Commitment.
When you are set to create your own key and keystore, make sure y'all first cull a strong password for your keystore and a divide strong password for each private key stored in the keystore. You must keep your keystore in a safe and secure place. If you lose access to your app signing key or your key is compromised, Google cannot remember the app signing key for you, and you will not be able to release new versions of your app to users equally updates to the original app. For more data, run across Secure your key, below.
If yous manage your own app signing key and keystore, when you sign your APK, you will sign it locally using your app signing key and upload the signed APK directly to the Google Play Shop for distribution as shown in figure 10.
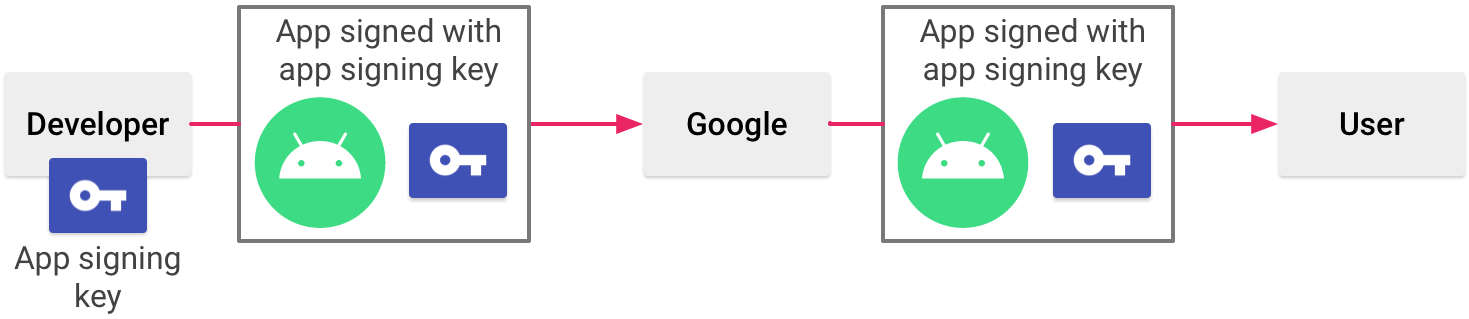
Figure 12. Signing an app when you manage your own app signing key
When yous use Play App Signing, Google keeps your signing fundamental safe, and ensures your apps are correctly signed and able to receive updates throughout their lifespans. However, if you make up one's mind to manage your app signing key yourself, there are a few considerations you should proceed in mind.
Signing considerations
You should sign your app with the same certificate throughout its expected lifespan. At that place are several reasons why you lot should practise so:
- App upgrade: When the system is installing an update to an app, it compares the certificate(s) in the new version with those in the existing version. The arrangement allows the update if the certificates match. If y'all sign the new version with a dissimilar certificate, you must assign a dissimilar bundle name to the app—in this case, the user installs the new version as a completely new app.
- App modularity: Android allows APKs signed by the same certificate to run in the aforementioned process, if the apps so request, so that the system treats them equally a unmarried app. In this way you tin can deploy your app in modules, and users tin can update each of the modules independently.
- Code/data sharing through permissions: Android provides signature-based permissions enforcement, and then that an app can betrayal functionality to another app that is signed with a specified certificate. By signing multiple APKs with the same certificate and using signature-based permissions checks, your apps can share code and data in a secure way.
If you lot plan to back up upgrades for an app, ensure that your app signing primal has a validity period that exceeds the expected lifespan of that app. A validity menstruation of 25 years or more is recommended. When your key's validity period expires, users will no longer be able to seamlessly upgrade to new versions of your app.
If you programme to publish your apps on Google Play, the fundamental you lot utilise to sign your app must have a validity menstruum ending after 22 October 2033. Google Play enforces this requirement to ensure that users tin seamlessly upgrade apps when new versions are available.
Keep your primal secure
If you choose to manage and secure your app signing cardinal and keystore yourself (instead of opting in to Play App Signing), securing your app signing cardinal is of critical importance, both to yous and to the user. If yous allow someone to use your key, or if you leave your keystore and passwords in an unsecured location such that a third-political party could find and apply them, your authoring identity and the trust of the user are compromised.
If a third political party should manage to take your app signing key without your knowledge or permission, that person could sign and distribute apps that maliciously supplant your authentic apps or decadent them. Such a person could also sign and distribute apps under your identity that attack other apps or the system itself, or decadent or steal user data.
Your private central is required for signing all future versions of your app. If you lot lose or misplace your primal, you volition not be able to publish updates to your existing app. You cannot regenerate a previously generated cardinal.
Your reputation every bit a developer entity depends on your securing your app signing fundamental properly, at all times, until the cardinal is expired. Hither are some tips for keeping your key secure:
- Select strong passwords for the keystore and key.
- Practise not give or lend anyone your individual key, and exercise not permit unauthorized persons know your keystore and key passwords.
- Keep the keystore file containing your private central in a safe, secure identify.
In general, if you follow mutual-sense precautions when generating, using, and storing your fundamental, information technology volition remain secure.
Remove signing information from your build files
When you create a signing configuration, Android Studio adds your signing data in plainly text to the module's build.gradle files. If y'all are working with a squad or open-sourcing your code, you should move this sensitive information out of the build files and so it is non hands accessible to others. To do this, you should create a separate properties file to store secure data and refer to that file in your build files as follows:
- Create a signing configuration, and assign it to one or more build types. These instructions assume you have configured a single signing configuration for your release build type, equally described in Configure the build process to automatically sign your app, in a higher place.
- Create a file named
keystore.propertiesin the root directory of your project. This file should contain your signing information, as follows:storePassword=myStorePassword keyPassword=mykeyPassword keyAlias=myKeyAlias storeFile=myStoreFileLocation
- In your module'due south
build.gradlefile, add code to load yourkeystore.backdropfile before theandroid {}cake.Groovy
... // Create a variable called keystorePropertiesFile, and initialize it to your // keystore.backdrop file, in the rootProject binder. def keystorePropertiesFile = rootProject.file("keystore.backdrop") // Initialize a new Properties() object called keystoreProperties. def keystoreProperties = new Properties() // Load your keystore.properties file into the keystoreProperties object. keystoreProperties.load(new FileInputStream(keystorePropertiesFile)) android { ... }Kotlin
... import java.util.Properties import java.io.FileInputStream // Create a variable called keystorePropertiesFile, and initialize it to your // keystore.properties file, in the rootProject folder. val keystorePropertiesFile = rootProject.file("keystore.properties") // Initialize a new Properties() object called keystoreProperties. val keystoreProperties = Properties() // Load your keystore.properties file into the keystoreProperties object. keystoreProperties.load(FileInputStream(keystorePropertiesFile)) android { ... }Note: You could choose to store your
keystore.propertiesfile in another location (for example, in the module folder rather than the root folder for the project, or on your build server if y'all are using a continuous integration tool). In that example, you should change the code higher up to correctly initializekeystorePropertiesFileusing your actualkeystore.backdropfile's location. - You tin can refer to backdrop stored in
keystorePropertiesusing the syntaxkeystoreProperties['propertyName']. Modify thesigningConfigsblock of your module'southbuild.gradlefile to reference the signing data stored inkeystorePropertiesusing this syntax.Cracking
android { signingConfigs { config { keyAlias keystoreProperties['keyAlias'] keyPassword keystoreProperties['keyPassword'] storeFile file(keystoreProperties['storeFile']) storePassword keystoreProperties['storePassword'] } } ... }Kotlin
android { signingConfigs { getByName("config") { keyAlias = keystoreProperties["keyAlias"] keyPassword = keystoreProperties["keyPassword"] storeFile = file(keystoreProperties["storeFile"]) storePassword = keystoreProperties["storePassword"] } } ... } - Open the Build Variants tool window and ensure that the release build type is selected.
- Select an choice under Build > Build Parcel(due south) / APK(s) to build either an APK or app package of your release build. Yous should see the build output in the
build/outputs/directory for your module.
Because your build files no longer contain sensitive data, you can at present include them in source command or upload them to a shared codebase. Be sure to keep the keystore.properties file secure. This may include removing it from your source command system.
hitchcockoffearmed.blogspot.com
Source: https://developer.android.com/studio/publish/app-signing
0 Response to "To Upload an Android App Bundle You Must Be Enrolled in App Signing by Google Play."
Post a Comment